

How To Add A Brush In Photoshop

How To Make Your Own Custom Photoshop Brushes
In this tutorial, we'll acquire how like shooting fish in a barrel it is to make our own custom Photoshop brushes! Photoshop ships with lots of smashing brushes for us to use, simply it's mode more fun and interesting to create our own, particularly after Adobe completely revamped the brush engine in Photoshop 7, adding unprecedented painting power to what was already the world's most powerful image editor.
Since the types of brushes we can create in Photoshop are limited just by our imagination, nosotros'll design a very simple brush hither just to see how quick and easy the whole process is. We'll too take a look at a couple of Photoshop's dynamic brush options in the Brushes panel to see how nosotros can alter the behavior of the brush subsequently we create it.
Let'due south get started!
Pace 1: Create A New Photoshop Document
Permit's brainstorm past creating a brand new Photoshop document which we'll utilise to design our castor. Once again, the purpose of this tutorial is not to learn how to create this exact brush, but rather to come across how the procedure works from beginning to end. I'grand going to create a new 200 x 200 pixel certificate by going up to the File menu in the Carte du jour Bar at the tiptop of the screen and choosing New. Or, for a faster way to create a new certificate, press Ctrl+N (Win) / Command+North (Mac) on your keyboard:
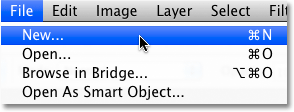
Go to File > New.
This opens the New Document dialog box. Enter 200 for both the Width and Height options and make sure the measurement type is gear up to pixels. Also, make certain the Groundwork Contents option is set to White since nosotros need white to be the background color for the brush:
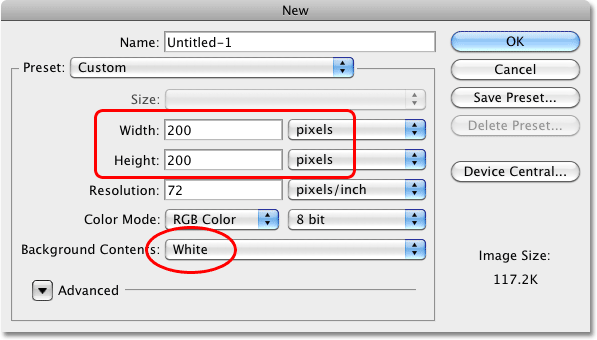
Create a new 200 ten 200 pixel document with a white groundwork.
Click OK when you're done to accept the settings and exit out of the dialog box. A new 200 x 200 pixel document, filled with white, volition appear on your screen.
Choosing An Initial Size For Your Castor
Photoshop allows us to create brushes as large as 2500 ten 2500 pixels, but as they say, just because yous can doesn't mean you should. At that size, y'all'd be painting with the virtual equivalent of a floor mop. Also, painting with very large brushes requires a lot more than memory and horse power from your reckoner which can slow your system downward considerably. For typical work, you'll want to create brushes much smaller.
The size at which you initially create the brush will go its default size, and information technology's important to notation that brushes we create ourselves are pixel-based brushes, which means they're essentially images and comport exactly the same way equally regular images when it comes to resizing them. Brushes volition usually remain crisp and precipitous when nosotros make them smaller, just if you lot increase their size much across the default, they'll become soft and dull looking. The general idea, then, is to create your new brush just big enough to arrange your needs, which may involve a petty trial and error. The 200 ten 200 pixel size I'm using here commonly works well.
Step 2: Select The Brush Tool
Permit'south create our new brush using one of Photoshop'southward born brushes. First, select the Brush Tool from the Tools palette, or press the alphabetic character B on your keyboard to chop-chop select information technology with the shortcut:
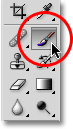
Select the Castor Tool.
Pace 3: Select A Small Round Brush
With the Brush Tool selected, right-click (Win) / Control-click (Mac) anywhere inside the certificate window to display the Brush Preset picker, which is a miniature version of the full-blown Brushes panel that we'll look at a bit later (and we'll examine in much more detail in another tutorial). The Brush Preset picker allows u.s. to choose from a list of preset brushes (which explains its proper name). To select a brush, simply click on its thumbnail. I'm going to click on the Hard Round 5 Pixels castor to select it. If you have Tool Tips enabled in Photoshop's Preferences, the proper noun of each brush will appear as y'all hover over the thumbnails. Press Enter (Win) / Return (Mac) once you've called your brush to close out of the palette:

Select a small round castor from the Preset picker, then printing Enter (Win) / Render (Mac) to shut out of it.
Step iv: Brand Sure The Foreground Color Is Set To Black
Back when we created our new document in Step 1, we fabricated sure to set the background color of our certificate to white. The reason is that all brushes in Photoshop are Grayscale, meaning that a brush can comprise just black, white, or shades of grayness in between. Areas filled with white become transparent, and so you won't see them when you're painting with the castor. Areas filled with black will exist 100% visible, and if your brush includes various shades of gray, those areas will be partially visible depending on how close they are to black or white, with darker shades of gray existence more visible than lighter shades.
If nosotros were to turn our new document into a castor as information technology is right now, the unabridged brush would be transparent since it contains nothing but white. Painting with an invisible brush may make an interesting statement artistically, but for more practical purposes (similar this tutorial), y'all'll well-nigh likely desire a castor you tin can actually see, which means we'll need to add some areas of black to the document. The blackness areas will become the visible shape of the castor (known as the brush tip).
Photoshop paints using the current Foreground colour, and as luck would have information technology, the default for the Foreground color is black, which means at that place's a very good take a chance yours is already set to blackness. Yous tin can run across the electric current Foreground and Groundwork colors by looking at their color swatches near the bottom of the Tools palette (the Foreground color is the swatch in the top left). If your Foreground colour is set up to something other than black, press the alphabetic character D on your keyboard to quickly reset both the Foreground and Groundwork colors to their defaults:
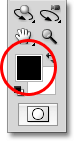
The Foreground color is the color the castor will paint with.
Pace 5: Paint A Series Of Horizontal Brush Strokes Inside The Document Window
With the pocket-size round castor selected and black as your Foreground color, click inside the document window and pigment a serial of short horizontal brush strokes. For added diverseness, alter the thickness of the strokes by irresolute the size of the brush using the handy keyboard shortcuts. Printing the left bracket key ( [ ) to brand the brush smaller or the right subclass key ( ] ) to make it larger. You'll find the bracket keys to the correct of the alphabetic character P on most keyboards. When you're done, you should have a column of castor strokes that looks something like this:
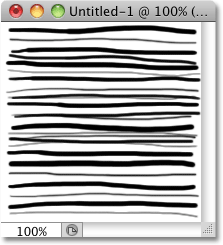
A cavalcade of messy, random brush strokes.
Step half dozen: Create A New Castor From The Document
To create a new Photoshop brush from the certificate, simply go upward to the Edit menu at the top of the screen and choose Define Brush Preset from the list of options (depending on which version of Photoshop you're using, the option may be called simply Ascertain Brush):

Become to Edit > Define Brush Preset.
Photoshop volition pop open up a dialog box asking yous to give your new brush a name. I'm going to call mine "My New Castor". You'll probably desire to choose a name that's a lilliputian more descriptive:

Proper noun the new castor.
Click OK when you're done to close out of the dialog box, and that's all there is to it! Nosotros've successfully created a make new custom brush in Photoshop that'due south ready and waiting to help us bring our creative vision to life. Yous can safely shut out of the brush's document at this point.
To select the new brush any fourth dimension yous need it, first make sure you lot have the Brush Tool selected, then right-click (Win) / Control-click (Mac) anywhere inside your certificate to open the Castor Preset picker. Scroll downward the listing of available brushes until y'all run into your brush thumbnail (newly created brushes will appear at the lesser of the listing), then click on the thumbnail to select the castor. Press Enter (Win) / Return (Mac) once you've selected it to close out of the Castor Preset picker:
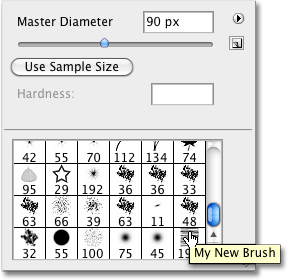
Select your new brush from the Brush Preset picker.
With the new brush selected, simply click and elevate within your document to paint a brush stroke:
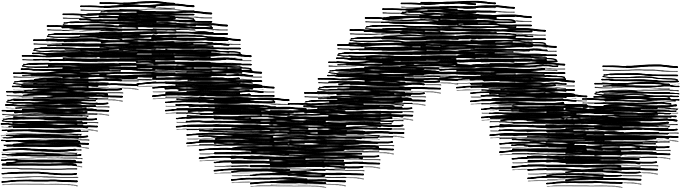
The newly created brush in activeness.
It's a skillful start, but I remember it's safe to say that at this stage, my new castor volition exist of express employ. Fortunately, now that we've created a castor tip, we can change and control how the brush behaves as we paint with it using Photoshop's Brush Dynamics, found in the main Brushes console, which we'll have a quick look at next!
Step 7: Open The Brushes Panel
We've seen how to select a basic, ready-made brush using the Castor Preset picker, but if want more control over how our castor behaves, we demand Photoshop'south main Brushes console, which gives us total admission to some truly amazing options. Nosotros'll salvage our detailed look at the Brushes panel and all of its controls for another tutorial, but let's take a quick expect at a few ways we can utilise it to modify the appearance of our castor strokes.
To open the Brushes panel, either go up to the Window card at the summit of the screen and choose Brushes from the listing, or press the F5 central on your keyboard (press it again to close the panel), or click on the Brushes panel toggle icon in the Options Bar (click it once more to shut the panel):
The toggle icon in the Options Bar opens and closes the Brushes panel.
This opens the primary Brushes panel, the big brother of the Castor Preset picker we saw before. By default when y'all showtime open the Brushes console, the Brush Presets selection is selected in the top left corner of the panel, which displays the aforementioned minor brush icons along the correct that nosotros saw in the Castor Preset picker. To select a castor, just click on its icon. Scroll down the list to your newly created castor and click on its icon to select it if information technology's not selected already. The very bottom of the Brushes panel displays a preview of what the brush stroke currently looks like. Since I haven't made any changes yet, the preview looks exactly the same as the brush stroke I painted a moment ago:
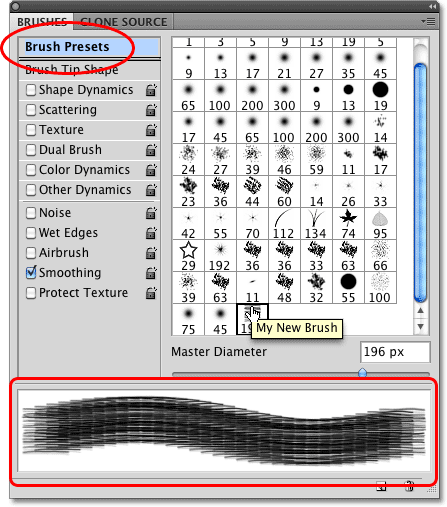
The main Brushes panel in Photoshop set to the Brush Presets selection.
Pace 8: Adjust The Brush Tip Spacing
Click on the words Brush Tip Shape directly below the Castor Presets option in the top left corner of the Brushes panel:
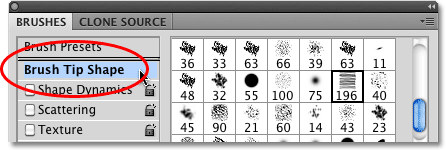
Click on the Brush Tip Shape option.
In the real world, if you were to paint with an actual castor, the castor would lay downwardly a continuous coat of paint on the newspaper, merely that's not how Photoshop works. Instead, Photoshop "stamps" the document with your castor tip as you lot drag your mouse. If the stamps appear close enough together, it creates the illusion of a seamless castor stroke, but if the stamps are spaced besides far apart from each other, the private stamps become obvious and the brush stroke appears ridged. Depending on the effect you're going for (like creating a dotted line, for instance), you may want a lot of spacing between the stamps, but in virtually cases, a seamless castor stroke is more desirable.
With the Brush Tip Shape selection selected in the Brushes panel, we can control the spacing betwixt the stamps with the appropriately-named Spacing pick at the very bottom of the panel. Spacing is controlled as a percentage of the width of your brush tip, and by default, it's fix to 25%, which means that if the width of your castor tip is 100 pixels, Photoshop will lay down a new stamp every 25 pixels as y'all elevate your mouse:
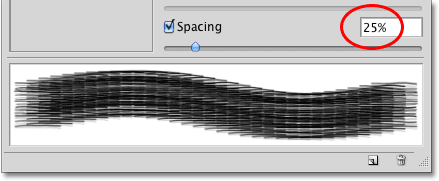
The Spacing selection controls how frequently Photoshop "stamps" the brush tip every bit you paint.
For a smooth brush stroke, this default setting is commonly too high. I'1000 going to lower mine downwardly to around 13%. To lower the Spacing amount, either elevate the slider towards the left or enter a specific value directly into the input box. You'll run into the preview of the brush stroke updating to reflect the changes to the spacing:
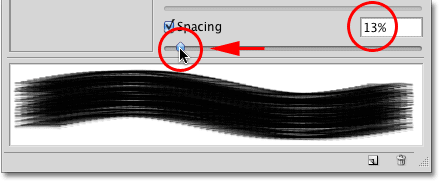
Lower the Spacing amount for a smoother looking brush stroke.
Now, if I paint a stroke with my castor, it appears smoother because the individual stamps are closer together:
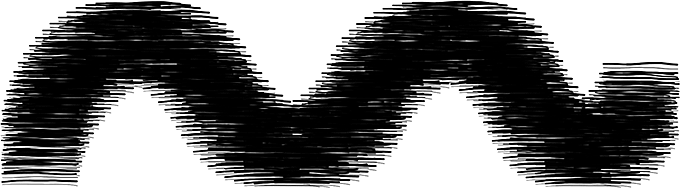
With the brush tip "stamps" being closer together, the stroke appears smoother.
Step 9: Select The Shape Dynamics Option
Click direct on the words Shape Dynamics below the Brush Tip Shape option nosotros selected a moment ago, which gives us options for dynamically controlling the size, bending and roundness of the castor tip as we paint. Make certain yous click on the words themselves. Clicking inside the checkbox to the left of words will turn the options on but won't give us admission to their controls:
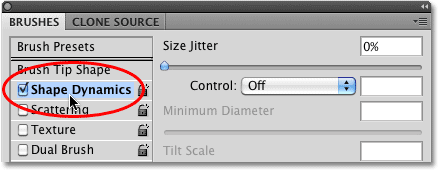
Click directly on the words "Shape Dynamics".
Step 10: Set The Angle Command To "Direction"
The master problem with the expect of my brush stroke is that no matter which management I pigment in, those horizontal lines that make up my brush tip remain, well, horizontal. Let's fix that so the brush tip will follow the direction of my mouse cursor. With the Shape Dynamics option selected, change the Command choice for the brush tip Angle to Management. Again, you'll see the brush stroke preview at the bottom of the panel update to reflect the change:
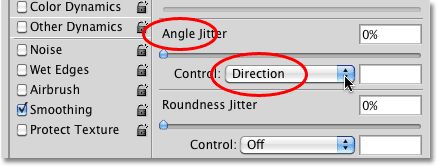
Alter the Control option for the Angle to "Management".
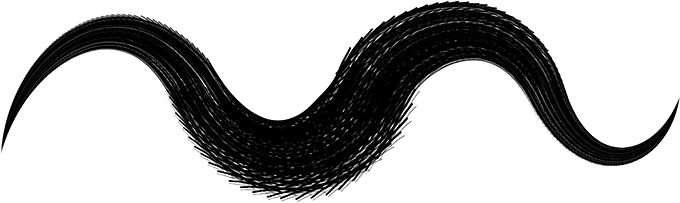
I'll paint another stroke with my brush, and this time, things look much more natural. The brush tip is following the management I'm painting in:
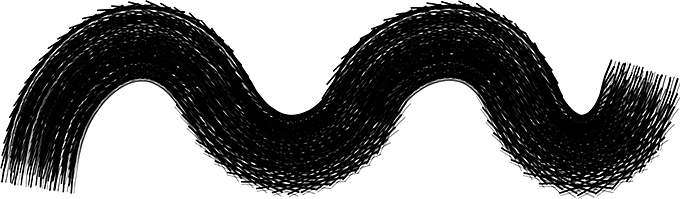
A more natural looking castor stroke.
Stride 11: Set The Size Control To "Pen Pressure" (Requires Pen Tablet)
If yous're using a pressure-sensitive pen tablet like I am, yous can tell Photoshop that you want to command the size of the brush with your pen. With the Shape Dynamics options still selected, change the Control choice for the brush tip Size to Pen Force per unit area:
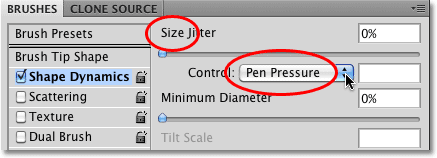
Change the Control pick for the Size of the brush to "Pen Pressure" (if yous accept a pen tablet, that is).
With the Pen Pressure level option selected, I can easily control the size of the brush stroke on the fly, giving my custom brush an even more than natural look:
The size of the brush can now exist controlled dynamically with pen pressure.
Where to go next...
Obviously, this is merely a taste of the corporeality of command the Brushes panel gives u.s.a. over the beliefs of our brush, but in only a few short steps, nosotros've managed to design and create a brand new custom Photoshop castor from scratch, and nosotros've gotten a glimpse of how powerful the various dynamic castor controls in the Brushes console really are. Nosotros'll embrace the Brushes panel in much more detail in another tutorial.
And there we have it! Visit our Photoshop Basics section for more than tutorials on the basics of Photoshop!
Other Stuff
© 2022 Photoshop Essentials.com.
For inspiration, not duplication.
Site design by Steve Patterson.
Photoshop is a trademark of Adobe Systems Inc.

How To Add A Brush In Photoshop,
Source: https://www.photoshopessentials.com/basics/photoshop-brushes/make-brushes/
Posted by: wardposs1950.blogspot.com
0 Response to "How To Add A Brush In Photoshop"
Post a Comment